Embarking on the journey of powering up your own space is an exciting venture, and understanding how to start a portable generator is the first step towards unleashing a world of convenience. Picture those moments when a sudden outage disrupts your day—your solution lies in the simplicity of mastering your portable generator. It’s not just about flipping switches; it’s about gaining control and ensuring that your environment stays lit and vibrant.
In this guide, we’ll walk hand-in-hand through the empowering process of starting a portable generator, transforming potential moments of darkness into a canvas of resilience and preparedness. Let’s dive into the art of generator ignition!
Jump to a Specific Section
- 1 TLDR
- 2 How to Start a Portable Generator?
- 3 How Does a Portable Generator Work?
- 4 How to Use a Portable Generator?
- 5 How to Refuel Your Portable Generator?
- 6 Generator Safety Tips
- 7 Conclusion
- 8 References
- 9 Frequently Asked Questions
- 9.1 How Often Should I Check the Fuel and Oil Levels of My Portable Generator?
- 9.2 Can I Use My Portable Generator Indoors?
- 9.3 What Is the Recommended Distance to Keep Between the Generator and Other Objects or Structures?
- 9.4 How Often Should I Clean the Air Filter on My Portable Generator?
- 9.5 Can I Connect My Portable Generator Directly to My Home’s Electrical System?
- 9.6 How do you turn on a portable generator?
- 9.7 Should the choke on a generator be open or closed?
- 9.8 What is the most common reason a generator won’t start?
TLDR
- Prioritize safety by placing the generator outdoors, away from living spaces, to prevent carbon monoxide exposure.
- Always follow the manufacturer’s guidelines for fuel type and capacity to ensure optimal performance and longevity.
- Master the startup sequence: switch the fuel valve on, set the choke, start the engine, and gradually adjust the choke as the generator warms up.
- Regular maintenance, including oil checks and filter replacements, is crucial for reliable operation and prolonged generator life.
How to Start a Portable Generator?
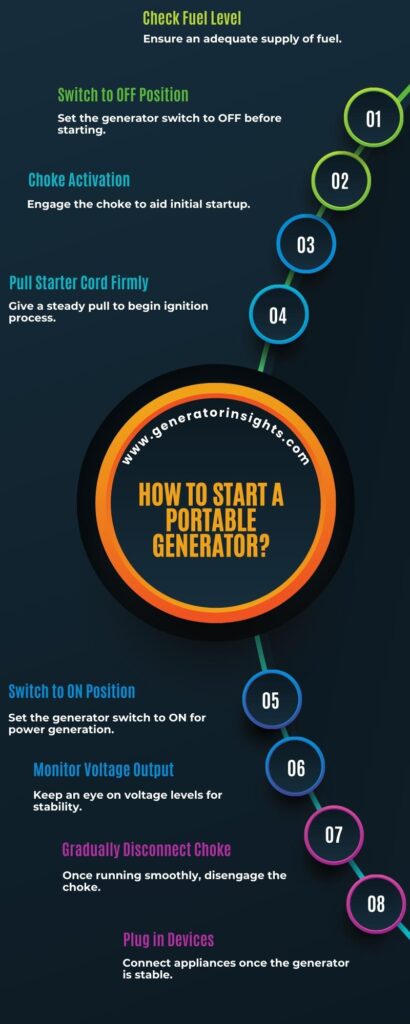
To start a portable generator, follow these steps:
- Place the Generator: Position the generator on a flat, level surface outdoors, away from buildings, and ensure there’s proper ventilation.
- Fuel Check: Check the fuel level. Ensure there’s enough gasoline or propane in the tank to run the generator.
- Oil Check: Check the oil level. Ensure it’s at the recommended level indicated in the owner’s manual.
- Choke Setting: If your generator has a choke, set it to the “Choke” position when starting a cold engine.
- Fuel Valve: Turn on the fuel valve to allow fuel to flow to the engine.
- Ignition Switch: Turn the ignition switch to the “On” position.
- Pull Cord or Electric Start: If your generator has a pull cord, grasp it firmly and pull it steadily until you feel resistance, then pull briskly. If it has an electric start, turn the key or push the button.
- Warm-Up: Let the generator run for a few minutes to warm up and stabilize. If you used the choke, gradually move it to the “Run” position as the engine warms up.
- Power Distribution: After the generator has stabilized, you can connect your devices to it using the appropriate outlets or transfer switch.
- Shut Down: To turn off the generator, first disconnect all devices, then turn off the generator’s circuit breaker or switch. Let it run for a few minutes without a load to cool down. Finally, turn the ignition switch to the “Off” position and close the fuel valve to stop the engine.
Always refer to your generator’s specific owner’s manual for detailed instructions and safety precautions.
Now let’s discuss the whole process of starting a generator in detail.
Familiarize Yourself With the Generator
To effectively operate a portable generator, it is essential to become familiar with its various components and functions. This knowledge will not only help you start the generator smoothly but also enable you to troubleshoot any issues that may arise during its operation.
One of the key components of a portable generator is the engine, which is responsible for converting fuel into mechanical energy. Understanding how the engine works and how to properly maintain it is crucial for ensuring the generator’s optimal performance.
Another important aspect is the fuel system. Generators usually run on gasoline, diesel, or propane. You should familiarize yourself with the specific fuel requirements of your generator and ensure that you have an adequate supply of fuel available.
Additionally, it is essential to understand the power output of your generator. This includes knowing the rated power, surge power, and the various outlets available for connecting electrical devices. By understanding the power output, you can ensure that you are not overloading the generator and causing potential damage.
Lastly, familiarize yourself with the control panel and its functions. This includes the power switch, choke, fuel valve, and circuit breakers. Knowing how to operate these controls will make starting and stopping the generator a seamless process.
Check the Fuel and Oil Levels
When it comes to fuel levels, it’s imperative to keep a close eye on the fuel tank to avoid unexpected interruptions during prolonged power outages. Generators often have a built-in fuel gauge or a sight glass, making it convenient for users to monitor the fuel level visually. Regularly inspect the fuel system for any signs of leaks or damage, as these issues can compromise the generator’s ability to run smoothly.
In addition to monitoring the fuel level, it’s equally important to consider the type of fuel used by the generator. For example, if your generator relies on propane or diesel, check the supply regularly and ensure that the fuel is stored in accordance with safety guidelines. Keep in mind that different fuels have different storage requirements, and understanding these specifics will contribute to the overall reliability of your generator.
Now, let’s shift our focus to the oil levels. Adequate lubrication is crucial for the proper functioning of the generator’s engine. Many generators are equipped with an oil level indicator, allowing users to check the oil level easily. It’s advisable to check the oil level before each use and at regular intervals during extended operation. Insufficient oil levels can lead to excessive engine wear and potential damage, so it’s essential to address any deficiencies promptly.
Thus, regular checks of both fuel and oil levels are fundamental aspects of generator maintenance. By incorporating these tasks into your routine, you enhance the longevity and reliability of your standby power source, ensuring it’s always ready to kick in when you need it most.
Set Up the Generator for Operation
One crucial step in preparing the portable generator for operation involves conducting a thorough inspection of its components. Before starting the generator, it is important to ensure that all maintenance tasks have been completed in order to guarantee its optimal performance. This includes checking the oil level and making sure it is at the recommended level, as well as inspecting the air filter for any signs of dirt or damage. Additionally, it is necessary to examine the fuel tank and fuel lines for any leaks or blockages.
Generator maintenance is vital for the longevity and reliability of the equipment. Regularly cleaning and replacing filters, as well as changing the oil at recommended intervals, can help prevent costly repairs and extend the life of the generator.
Furthermore, following fuel storage guidelines is essential to ensure the generator operates efficiently. Fuel should be stored in a clean, dry, and well-ventilated area, away from any potential sources of ignition. It is also recommended to use a fuel stabilizer to prevent the fuel from deteriorating over time.
By conducting a thorough inspection and adhering to proper maintenance and fuel storage guidelines, the portable generator will be ready for operation.
Now, let’s move on to the next step of engaging the choke and fuel valve.
Engage the Choke and Fuel Valve
Starting a generator involves a series of crucial steps to ensure a smooth and reliable operation. One of the initial steps in the process is engaging the choke and fuel valve. These components play a vital role in the engine’s ignition, especially when starting a cold generator or one that has been inactive for a while.
When you’re ready to start the generator, locate the choke lever typically situated near the engine. The choke is a mechanism that regulates the air-to-fuel ratio, enriching the fuel mixture for easier ignition. In most generators, the choke lever has two positions: open and closed. For a cold start, the choke should be in the closed position.
Next, identify the fuel valve or petcock. This valve controls the flow of fuel from the tank to the engine. Ensure that the fuel valve is in the open position to allow fuel to reach the carburetor. If the generator has been in storage or inactive, it may take a moment for the fuel to prime the system.
Now, let’s delve into the process:
- Locate the Choke Lever: As mentioned earlier, find the choke lever and move it to the closed position if you are starting the generator from cold.
- Identify the Fuel Valve: Locate the fuel valve and ensure it is in the open position. This allows fuel to flow from the tank to the engine.
- Start the Generator: Following the manufacturer’s instructions, initiate the starting sequence. This usually involves turning the ignition switch or pressing a start button.
- Monitor the Engine: As the generator starts, pay attention to the engine sound. You may need to adjust the choke gradually as the engine warms up. Open the choke once the engine is running smoothly to allow for the normal air-to-fuel ratio.
- Check for Leaks: After the generator is running, inspect the area around the fuel valve for any signs of leaks. If you notice any leaks, shut off the generator immediately and address the issue before continuing.
Remember, these steps may vary slightly depending on the specific make and model of your generator, so always refer to the manufacturer’s manual for precise instructions. Additionally, regular maintenance, including checking and cleaning the choke and fuel valve, is essential to ensure reliable starts every time you need to use your generator.
Pull the Starter Cord or Use the Electric Start
To start a portable generator, one option is to pull the starter cord or utilize the electric start function. The electric start feature offers several advantages over the traditional starter cord method. Firstly, it eliminates the physical effort required to pull the cord, making it a more convenient option for individuals with limited strength or mobility. Additionally, the electric start ensures a smoother and more consistent startup, reducing the risk of engine flooding or stalling.
However, if you encounter issues with the starter cord, troubleshooting common problems can help you get your generator up and running. One common issue is the cord being difficult to pull or getting stuck. This can be caused by a variety of factors, such as a dirty or worn-out recoil starter assembly. In such cases, cleaning or replacing the assembly may be necessary. Another common problem is the cord not retracting fully, which can be due to a damaged or tangled recoil spring. Replacing the spring can resolve this issue.
Once you have successfully started the generator using either the starter cord or electric start, it is essential to allow the generator to warm up before connecting any appliances or tools. This allows the engine to reach its optimal operating temperature and ensures stable power output.
Allow the Generator to Warm Up
After starting the generator, it is recommended to let it warm up for at least 5 minutes to ensure proper functioning and performance. Allowing the generator to warm up before putting it to full use can significantly improve its performance and longevity. Here are a couple of reasons why warming up your generator is important:
- Optimal lubrication: During the initial few minutes of operation, the oil in the generator’s engine needs to warm up and circulate properly. This allows for optimal lubrication of the engine’s internal components, reducing friction and wear. A well-lubricated engine performs better and is less likely to develop issues over time.
- Stabilizing electrical output: Generators produce electricity by spinning a rotor within a stator. Allowing the generator to warm up helps stabilize the electrical output as the engine reaches its proper operating temperature. This ensures a consistent power supply and protects the connected devices from voltage fluctuations.
Monitor and Maintain the Generator During Operation
While operating a portable generator, it is essential to continuously monitor and maintain its performance to ensure optimal functionality and prevent any potential issues. Generator troubleshooting is an important aspect of this maintenance process. By regularly inspecting and evaluating various components, you can identify and address any problems before they escalate.
One of the first troubleshooting tips is to check the fuel level and ensure that the generator is adequately fueled. Additionally, monitoring the oil level and changing it regularly is crucial to prevent engine damage and ensure smooth operation.
It is also important to inspect the air filter regularly and clean or replace it as needed to maintain proper airflow and prevent engine performance issues. Another troubleshooting tip is to check the spark plug for any signs of wear or damage and replace it if necessary.
Lastly, monitoring the generator’s voltage output is crucial to ensure it is delivering the correct amount of power. By following these generator troubleshooting tips and regularly monitoring and maintaining your portable generator, you can prolong its lifespan, enhance its performance, and prevent any potential issues.
How Does a Portable Generator Work?
Portable generators are versatile power sources that can be used in various settings, from camping trips to emergency backup during power outages. Understanding how these generators work is essential for their effective and safe use.
A portable generator operates on the principle of electromagnetic induction. Inside the generator, a gasoline engine or another type of internal combustion engine is connected to an alternator. The alternator consists of a coil of wire that rotates within a magnetic field. As the engine turns the alternator, it generates an alternating current (AC).
To make this power usable for most applications, portable generators are equipped with power outlets that convert the AC to direct current (DC) and then back to AC through inverters. This ensures that the generated power is suitable for powering standard household appliances and electronic devices.
The amount of power a portable generator produces is measured in watts. It’s crucial to match the generator’s output with the power requirements of the devices you intend to connect. Portable generators typically range from a few hundred to several thousand watts, providing flexibility for different applications.
When you start a portable generator, the engine begins to turn the alternator, creating the necessary electric current. Most generators have a switch or pull cord to start the engine. Some higher-end models even come with electric starters for added convenience.
One important consideration is the fuel source. Portable generators commonly use gasoline, but models that run on propane or diesel are also available. The generator’s runtime depends on the fuel tank’s size and the generator’s fuel efficiency.
In summary, a portable generator works by converting mechanical energy from an internal combustion engine into electrical energy through the process of electromagnetic induction. Understanding its components, power output, and fuel source is essential for optimizing its performance in diverse settings.
How to Use a Portable Generator?
Using a portable generator efficiently is crucial for powering your essentials during emergencies or outdoor activities. Here’s a detailed guide on how to use a portable generator effectively:
- Read the Manual: It may seem basic, but reading the generator’s manual is essential. It provides specific instructions on setup, operation, and maintenance.
- Choose the Right Fuel: Ensure you have the correct fuel type for your generator—common options include gasoline, propane, or diesel. Use only the recommended fuel to avoid damage.
- Inspect and Prepare: Before starting the generator, inspect it for any visible damage. Check the oil level and add fuel if necessary. Ensure it’s placed on a flat, stable surface.
- Start the Generator: Follow the startup procedure outlined in the manual. Typically, this involves turning the fuel valve on, setting the choke, and pulling the starter cord or using the electric start.
- Connect Your Devices: Use the appropriate outlets on the generator to connect your devices. Avoid overloading by checking the generator’s wattage capacity and distributing the load accordingly.
- Monitor the Generator: Regularly check the generator for any issues, including unusual noises, vibrations, or leaks. Keep an eye on the fuel level and top it up when needed.
- Shut Down Properly: When you’re finished using the generator, allow it to run without a load for a few minutes to cool down. Then, turn off the generator and disconnect your devices.
- Store Safely: If you won’t be using the generator for an extended period, follow proper storage procedures. This may include draining the fuel, cleaning the generator, and storing it in a dry, cool place.
How to Refuel Your Portable Generator?
Ensuring a seamless power supply from your portable generator requires proper maintenance, and one crucial aspect is knowing how to refuel it efficiently. Here’s a step-by-step guide to keep your generator running smoothly.
- Turn Off the Generator: Before attempting to refuel, always turn off the portable generator and allow it to cool down. Safety is paramount, and working with a hot generator poses unnecessary risks.
- Locate the Fuel Cap: Identify the fuel cap, typically located on the top or side of the generator. It is essential to know the location to avoid any spills or mishaps during refueling.
- Use the Right Fuel: Ensure you are using the correct type of fuel recommended by the generator’s manufacturer. Common options include gasoline, diesel, or propane. Using the wrong fuel can damage the generator.
- Open the Fuel Cap Slowly: Loosen the fuel cap slowly to release any built-up pressure in the tank. This step prevents fuel from spraying out when you open the cap fully. Be cautious and take your time to avoid accidents.
- Fill the Tank Carefully: Use a clean and approved fuel container to add fuel to the generator’s tank. Pour carefully to avoid spillage, and if using a funnel, make sure it is clean and free of debris that could contaminate the fuel.
- Avoid Overfilling: Do not overfill the fuel tank. Most generators have a fuel gauge or a visual indicator to help you gauge the fuel level. Overfilling can lead to fuel spillage and pose a fire hazard.
- Securely Close the Fuel Cap: Once you’ve refueled the generator, securely tighten the fuel cap to prevent any leaks or evaporation. A loose cap can lead to fuel contamination and compromise the generator’s performance.
- Clean Up Spills Immediately: In case of any spills, clean them up promptly using absorbent materials. Fuel spills are not only hazardous but can also damage surfaces and pose environmental risks.
- Run the Generator to Distribute Fuel: Start the generator and let it run for a few minutes. This helps distribute the newly added fuel through the system and ensures proper combustion during operation.
- Check for Leaks: After refueling and running the generator, inspect for any signs of fuel leaks around the fuel cap and connections. Address any leaks immediately to prevent safety hazards.
Remember, following these steps not only ensures the optimal performance of your portable generator but also promotes safety during the refueling process. Always refer to the manufacturer’s guidelines for specific instructions related to your generator model.
If interested you can read how to turn off a portable generator safely here.
Generator Safety Tips
Ensuring the safe operation of a generator is paramount to prevent accidents and damage. Follow these guidelines to maintain a secure environment when using a generator:
| Safety Aspect | Tips |
|---|---|
| Location | Place the generator outdoors in a well-ventilated area, away from doors, windows, and vents. This prevents carbon monoxide buildup. |
| Distance from Structures | Keep the generator at least 20 feet away from your home, ensuring exhaust fumes disperse safely. |
| Grounding | Properly ground the generator to reduce the risk of electric shock. Follow the manufacturer’s guidelines for grounding procedures. |
| Fueling Safety | Turn off the generator and allow it to cool before refueling. Use the recommended fuel type and store fuel in approved containers. |
| Extension Cords | Utilize heavy-duty extension cords designed for outdoor use and ensure they are in good condition to prevent electrical hazards. |
| Load Management | Avoid overloading the generator by understanding its rated capacity. Prioritize essential appliances and distribute the load appropriately. |
| Regular Maintenance | Perform scheduled maintenance checks as outlined in the user manual. This includes oil changes, air filter inspections, and spark plug replacements. |
| Weather Precautions | During inclement weather, use a generator rain shelter to protect it from water exposure and potential damage. |
| Carbon Monoxide Monitoring | Install a carbon monoxide detector in areas where the generator is operating to detect any buildup of this colorless, odorless gas. |
| Cord Safety | Avoid tripping hazards by using cord covers or securing cords along walls and pathways. |
| Emergency Procedures | Establish and communicate emergency procedures with household members, including how to safely shut down the generator in case of any issues. |
Adhering to these safety tips ensures that your generator operates efficiently and minimizes the risk of accidents. Always prioritize safety to enjoy the benefits of backup power without compromising well-being.
Conclusion
In conclusion, ‘How to Start a Portable Generator’ unveils the essential steps to power up your generator efficiently. By following these simple yet crucial instructions, you ensure a reliable and consistent power source for your needs. Remember, regular maintenance and safety precautions are equally vital for the longevity of your generator. Let this guide be your go-to resource, providing you with the expertise to handle your generator with confidence. With these steps at your fingertips, you’re poised to conquer any situation that demands a reliable power supply, ensuring peace of mind in every scenario.
References
- Should we use a portable generator in an emergency?
- Carbon monoxide poisoning from portable electric generators
- Active-passive control of portable generator set radiated noise
- Studies on control of noise from portable power generator
Frequently Asked Questions
How Often Should I Check the Fuel and Oil Levels of My Portable Generator?
Regular checking of fuel and oil levels in a portable generator is crucial for proper maintenance and optimal performance. This ensures that the generator is always ready to provide reliable power when needed.
Can I Use My Portable Generator Indoors?
Using a portable generator indoors poses significant safety risks. Adequate ventilation is necessary to prevent carbon monoxide poisoning. Properly follow manufacturer’s guidelines and ensure the generator is placed outdoors in a well-ventilated area.
What Is the Recommended Distance to Keep Between the Generator and Other Objects or Structures?
To ensure safety, it is recommended to maintain a sufficient distance between a portable generator and other objects or structures. Adhering to recommended distance guidelines minimizes the risk of fire, carbon monoxide poisoning, and electrical hazards.
How Often Should I Clean the Air Filter on My Portable Generator?
The air filter on a portable generator should be cleaned regularly to maintain optimal performance. Cleaning frequency depends on usage, but typically every 50-100 hours of operation. Follow manufacturer’s instructions for maintenance tips to ensure longevity and efficient operation.
Can I Connect My Portable Generator Directly to My Home’s Electrical System?
Connecting a portable generator directly to a home’s electrical system is not recommended due to safety concerns. Proper grounding and installation of a transfer switch are necessary to ensure the safe and efficient operation of the generator.
How do you turn on a portable generator?
To start a fuel-powered generator, one should first turn the fuel valve to the On position. Next, set the on/off switch to the On position. Pull the choke handle out to the Choke position, and finally, push and hold the start switch in the Start position until the generator starts.
Should the choke on a generator be open or closed?
The choke, located either above the air filter or integrated into the power control knob, should be set to the closed position (also known as the start or choke position) when initiating the generator. This is applicable to various generator models, including those with a built-in choke like the WEN Inverter series.
What is the most common reason a generator won’t start?
The most frequent cause for a generator not starting is a dead battery. It is crucial to ensure the correct-sized battery is installed and undergo regular maintenance checks, including testing the battery. Generators typically require a battery replacement every 2 or 3 years for optimal performance.