
Discovering the heartbeat of your power source is more than a technicality; it’s an exploration into the vitality that fuels our daily lives. Ever wondered how to test alternator and ensure the lifeblood of your electricity remains robust? Step into the realm where volts and currents intertwine, as we unravel the mysteries behind these silent power sculptors.
This guide isn’t just a manual; it’s your companion on a journey to empower your understanding. Delve into the intricacies, connect with the essence of electricity, and learn how to unveil the health of your generator alternator with confidence.
TLDR
- Regular maintenance tasks for an alternator include checking belt tension, inspecting wiring connections, and cleaning debris or corrosion.
- Signs of a failing alternator include dimming or flickering headlights, dead or weak battery, and a squealing noise from the engine compartment.
- Essential testing equipment for alternator testing includes a digital multimeter, battery charger, and vehicle service manual.
- Performing a voltage test is crucial for accurately diagnosing the alternator’s health and determining if it is providing the correct voltage output.
What is an Alternator?
An alternator is an essential component of a vehicle’s electrical system. It is responsible for generating electrical power to charge the battery and run various electrical components, such as the lights and the radio.
To ensure the proper functioning of the alternator, regular maintenance is necessary. This includes checking the belt tension, inspecting the wiring connections, and cleaning any accumulated debris or corrosion. By performing these maintenance tasks, potential issues can be identified and resolved before they lead to a complete alternator failure.
There are several signs that indicate a failing alternator. One of the most common signs is a dimming or flickering of the headlights. This occurs because the alternator is not generating enough power to meet the electrical demands of the vehicle. Another sign is a dead or weak battery, as the alternator is responsible for charging the battery while the engine is running.
Additionally, a squealing noise coming from the engine compartment may indicate a worn-out alternator belt. Ignoring these signs and failing to address them promptly can result in a complete alternator failure, leaving the vehicle stranded and unable to start.
Therefore, it is crucial to be aware of these signs and take appropriate action to prevent further damage.
How to Test Alternator?
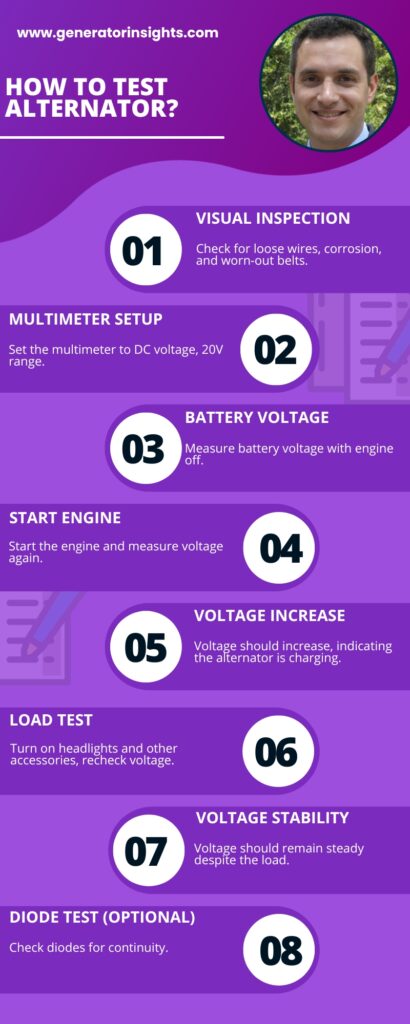
Testing the alternator of a generator is crucial to ensure its proper functioning and prevent potential issues. Below are the steps to effectively test an alternator:
- Check for Visual Signs:
- Begin by inspecting the alternator for any visible signs of damage or wear. Look for loose connections, damaged wires, or burnt components. Addressing these issues may resolve the problem without further testing.
- Use a Multimeter:
- A multimeter is an essential tool for testing alternators. Connect the multimeter to the generator’s battery while it’s running. A healthy alternator should show a voltage reading between 13.5 and 15.5 volts.
- Check Battery Voltage:
- Low battery voltage can indicate alternator issues. Before starting the generator, measure the battery voltage. Then, start the generator and recheck the voltage. If it doesn’t increase, the alternator may be faulty.
- Listen for Unusual Noises:
- Unusual sounds like squealing or grinding can suggest alternator problems. These noises may indicate worn-out bearings or other internal issues. Carefully listen to the generator while it’s running.
- Inspect Belt Tension:
- Ensure that the alternator belt is properly tensioned. A loose or slipping belt can lead to insufficient power generation. Adjust the tension according to the manufacturer’s specifications.
- Perform a Load Test:
- Introduce a load to the generator by connecting electrical appliances. Observe the performance under load. If the generator struggles or fails to provide a consistent power output, the alternator may be the culprit.
- Example:
- For instance, suppose you notice a drop in voltage when a load is applied, and the belt tension is correct. This could indicate a failing alternator, and further inspection or replacement may be necessary.
Remember, these steps are essential for maintaining a reliable generator, ensuring uninterrupted power supply when needed.
Now let’s discuss these steps in detail.
Gather the Necessary Tools for Testing
In order to ensure the efficient performance of a generator alternator, it’s crucial to have the right tools at your disposal. Precision is key when testing these components, and having the appropriate equipment enhances accuracy in diagnostics.
- Multimeter: A fundamental tool, the multimeter assists in measuring various electrical values, such as voltage and current, providing essential insights into the alternator’s health.
- Load Tester: This tool helps evaluate the alternator’s ability to withstand varying loads. By applying a load and observing the response, you can identify potential issues and assess the overall functionality.
- Clamp Meter: Ideal for measuring current without disconnecting wires, a clamp meter simplifies the testing process, offering convenience and safety.
- Insulation Tester: To detect potential faults in the insulation of wires and windings, an insulation tester is indispensable. This ensures the alternator operates without risks of short circuits.
- Tachometer: Monitoring the alternator’s speed is critical. A tachometer aids in confirming that the generator alternator is operating within the specified RPM range.
- Diagnostic Software: In the modern era, utilizing diagnostic software tailored for alternator testing provides advanced insights. These tools can interpret data and highlight irregularities that might not be apparent through manual inspection alone.
Ensure that these tools are in optimal condition and calibrated regularly to maintain the accuracy of your testing procedures.
Perform a Voltage Test
When ensuring the optimal functionality of a generator alternator, a voltage test is a crucial diagnostic step. This examination helps identify potential issues and ensures the smooth operation of the alternator. Below are the steps involved in performing a comprehensive voltage test:
- Prepare the Multimeter: Ensure the multimeter is set to the voltage measurement mode. This step is essential to obtain accurate readings during the test.
- Locate the Voltage Regulator: Identify the voltage regulator on the generator alternator. It is typically situated near the alternator and is responsible for maintaining a consistent voltage output.
- Connect the Multimeter: Attach the multimeter leads to the positive and negative terminals of the generator alternator. The positive lead should be connected to the output terminal, while the negative lead is connected to the generator’s ground.
- Start the Generator: Initiate the generator to start the alternator. Ensure the generator is running at its normal operating speed during the voltage test.
- Observe the Multimeter Reading: Monitor the multimeter display for the voltage reading. A properly functioning alternator should produce a voltage within the manufacturer’s specified range.
- Adjustments and Troubleshooting: If the voltage reading is outside the acceptable range, adjustments may be necessary. Refer to the generator’s manual for specific guidance on adjusting the voltage regulator.
- Repeat the Test: For thorough evaluation, perform the voltage test multiple times. Consistent readings within the acceptable range confirm the proper functioning of the generator alternator.
By following these steps, you can effectively perform a voltage test on your generator alternator, ensuring its reliability and longevity.

Interpret the Results
Voltage testing is a critical aspect of assessing the health and functionality of a generator alternator. Understanding the results is pivotal for efficient maintenance. The normal voltage range is 13.5 V to 15.5 V.
- Steady Voltage Output: A consistent voltage output within the normal range (13.5 V to 15.5 V) indicates a well-functioning generator alternator, ensuring optimal power generation.
- Low Voltage Output: Voltage below 13.5 V may signify issues such as a failing alternator or a weak battery. It can lead to insufficient power supply, affecting the overall performance of the system.
- High Voltage Output: Conversely, a voltage exceeding 15.5 V can indicate overcharging. This may damage electronic components and shorten the lifespan of the battery.
- Fluctuating Voltage: Fluctuations in voltage, even within the normal range, could suggest irregularities. Investigate potential causes, such as loose connections or a malfunctioning voltage regulator.
- Example Scenario: For instance, if the voltage consistently reads 14.5 V, it falls within the normal range, signifying a healthy generator alternator.
Understanding and interpreting these voltage testing results are crucial for maintaining a reliable and efficient power generation system. Regular monitoring ensures prompt identification and resolution of potential issues, preventing costly breakdowns.
Check Alternator Diodes for Faults
When it comes to ensuring the proper functioning of your alternator, it is essential to test the diodes for any potential faults. The diodes in the alternator are responsible for converting the alternating current (AC) produced by the alternator into direct current (DC) that charges the battery and powers the electrical components of the vehicle.
To test the alternator diodes, you can use alternator diode testing methods. One common method is to use a multimeter set to the diode test mode. Start by disconnecting the negative terminal of the battery to avoid any electrical mishaps. Then, connect the positive lead of the multimeter to the alternator’s positive diode terminal and the negative lead to the ground. Repeat this process for the negative diode terminal as well. A good diode will read a low resistance or continuity in one direction and high resistance or no continuity in the opposite direction.
It is important to be aware of the common signs of alternator diode failure, such as dim or flickering headlights, electrical system malfunctions, or a dead battery. If you notice any of these symptoms, it is recommended to perform a diode test to confirm if the diodes are faulty.
Assess Alternator Belt Tension
One important step in maintaining your alternator is regularly checking the tension and condition of the alternator belt. Assessing belt tension and inspecting belt condition are crucial tasks that ensure the proper functioning of your alternator. Here are some key points to consider:
Assessing Belt Tension:
- Start by locating the tensioner pulley. Use a wrench or socket to rotate the tensioner and release the tension on the belt.
- Measure the belt deflection by pressing down on the belt with your thumb. The ideal deflection should be between 1/4 and 1/2 inch.
- If the deflection is too loose or tight, adjust the tension by either tightening or loosening the tensioner pulley.
Inspecting Belt Condition:
- Look for signs of wear, cracks, fraying, or glazing on the belt’s surface. These indicate a need for replacement.
- Check for proper alignment of the belt. It should be centered on each pulley and not riding too high or too low.
- Ensure that the belt is free from any debris or oil contamination, as this can affect its performance.
Regularly assessing belt tension and inspecting belt condition will help prevent belt failure, ensure efficient power generation, and extend the lifespan of your alternator. By following these steps, you can maintain a reliable and functional alternator system.
Is 14.5 volts Normal for an Alternator?
In the realm of alternators, a normal voltage output typically falls between 13.5 and 15.5 volts when your vehicle is in operation. This voltage range is designed to efficiently charge your battery without the risk of overcharging.
Various factors influence alternator voltage. The condition of your battery, the electrical load on your vehicle, and the speed of your engine all play a role. A well-functioning alternator adapts its voltage output to maintain stability in your vehicle’s electrical system.
Detecting irregularities in voltage is crucial. Consistently low voltage can lead to a depleted battery, while consistently high voltage may result in damage to electronic components. Regular checks for voltage levels can help you identify potential issues early on.
Thus, while 14.5 volts is generally considered normal for an alternator, it’s essential to understand the broader voltage range and monitor for any deviations. Regular checks and prompt attention to irregularities contribute to the overall health and longevity of your vehicle’s electrical system.
Tips for Troubleshooting Alternator Issues
Ensuring the proper functioning of your generator alternator is crucial for a seamless power supply. Here are some tips for troubleshooting generator alternator issues:
- Inspect Wiring Connections: Check for loose or damaged wiring connections. Secure connections prevent power disruptions.
- Evaluate Belt Tension: A properly tensioned belt ensures optimal power transfer. Adjust if too loose or replace if worn.
- Test Voltage Output: Use a multimeter to measure voltage output. Deviations from the expected values may indicate potential issues.
- Examine Brushes: Worn-out brushes can hinder electrical contact. Regularly inspect and replace brushes to maintain efficiency.
- Check for Physical Damage: Inspect the alternator for any physical damage such as bent components or cracks. Addressing such issues promptly prevents further damage.
- Monitor for Unusual Noises: Unusual sounds during operation could indicate internal problems. Investigate and address any unusual noises promptly.
- Assess Cooling System: Overheating can damage the alternator. Ensure the cooling system is functioning correctly, and clean any debris obstructing airflow.
- Inspect Voltage Regulator: A faulty voltage regulator can lead to irregular power output. Test and replace if necessary.
- Verify Ground Connections: Ensure that the alternator’s ground connections are secure. Clean and tighten connections to maintain a reliable electrical path.
- Consider Environmental Factors: Extreme temperatures and moisture can impact alternator performance. Protect the alternator from harsh conditions to extend its lifespan.
- Perform Regular Maintenance: Implement a routine maintenance schedule. Cleaning and lubricating components can prevent issues before they arise.
Remember, addressing generator alternator issues promptly is essential for maintaining a reliable power supply.
Conclusion
In conclusion, knowing how to test alternator health is a valuable skill that can save you time, money, and the headache of unexpected breakdowns. By following the steps outlined in this guide, you can ensure your vehicle’s electrical system is running smoothly, promoting the longevity of your car. So, don’t wait until your car leaves you stranded on the side of the road. Take charge of your automotive maintenance today, and remember that testing your alternator is a key step in keeping your vehicle in top-notch condition.
References
- Active-passive control of portable generator set radiated noise
- Studies on control of noise from portable power generator
- Development of 500 W PEM fuel cell stack for portable power generators
- Modeling low-bandgap thermophotovoltaic diodes for high-efficiency portable power generators