Embarking on the journey of ensuring your portable generator delivers reliable power is a quest for peace of mind and uninterrupted electricity. In a world where unpredictability reigns, understanding How to Test Portable Generator Output becomes paramount. Imagine having the confidence that your generator not only starts with a roar but also delivers a consistent, reliable output.
This guide is your compass in navigating the intricacies of generator testing, empowering you to decipher the voltages and currents that fuel your essentials. Let’s unravel the mystery together, providing you with the tools to gauge your generator’s prowess and guaranteeing a steadfast power source when you need it most.
Jump to a Specific Section
- 1 TLDR
- 2 What is a Portable Generator and How It Works?
- 3 How Does a Portable Generator Produce Power?
- 4 Why Do You Need to Test The Output of Your Portable Generator?
- 5 How to Test Portable Generator Output?
- 6 Troubleshooting Common Generator Output Issues
- 7 Portable Generator Maintenance Tips
- 8 Portable Generator Safety Tips
- 9 Conclusion
- 10 References
- 11 Frequently Asked Questions
- 11.1 Can I Test the Output of My Generator Without Using a Multimeter?
- 11.2 How Long Does It Take to Test the Output of a Portable Generator?
- 11.3 What Should I Do if the Readings From My Multimeter Are Inconsistent?
- 11.4 Is It Possible to Damage My Generator While Testing Its Output?
- 11.5 How Often Should I Test the Output of My Portable Generator?
- 11.6 How do you measure the power output of a generator?
- 11.7 How do you load test a portable generator?
- 11.8 How do you tell if power comes back on if using a generator?
TLDR
- Testing the output of a portable generator is important for ensuring optimal performance and reliability.
- Load testing helps determine the generator’s capacity to supply electricity and identify any weaknesses or limitations.
- Monitoring voltage and frequency during load testing is essential to prevent damage to sensitive equipment and ensure optimal capacity.
- Necessary tools for testing include a multimeter, load bank, power analyzer, and safety equipment compatible with the generator’s specifications.
What is a Portable Generator and How It Works?
A Portable Generator is a versatile device designed to provide a convenient and temporary source of electrical power. These compact machines are particularly useful in situations where a reliable electrical supply is not readily available, such as during power outages, outdoor events, or construction projects. The key advantage of a portable generator lies in its mobility, allowing users to easily transport and deploy it wherever power is required.
Portable generators typically operate on various fuels, including gasoline, propane, or diesel. The basic working principle involves converting mechanical energy into electrical energy through a process known as electromagnetism. Inside the generator, a small engine, powered by the chosen fuel, turns an alternator, which consists of a rotor and a stator. As the rotor spins within a magnetic field created by the stator, it induces an electrical current. This alternating current (AC) is then processed through a built-in inverter to produce the desired electrical output suitable for powering a range of devices, from lights and appliances to electronic gadgets.
One of the notable features of portable generators is their user-friendly control panel, where individuals can easily start or stop the unit and regulate the power output. Additionally, many models come equipped with safety features such as circuit breakers to protect against overloads. While portable generators offer a convenient solution for temporary power needs, it’s essential to operate them safely by following manufacturer guidelines.
How Does a Portable Generator Produce Power?
Portable generators are versatile devices that provide on-the-go electrical power. Understanding how they produce power involves breaking down the process into key components:
- Engine: The generator houses an internal combustion engine, often fueled by gasoline or propane. This engine is responsible for converting chemical energy from the fuel into mechanical energy.
- Mechanical Energy: As the engine runs, it spins a shaft, generating mechanical energy. This rotational force is a crucial intermediary step in the power generation process.
- Alternator: Connected to the engine’s shaft is an alternator, also known as a generator head. The alternator contains a coil of wire that rotates within a magnetic field. This rotation induces an alternating current (AC) in the wire.
- Conversion to Electricity: The generated AC is not yet suitable for most household appliances, which operate on direct current (DC). To make it usable, the AC is passed through a component called a rectifier, which converts it into DC.
- Voltage Regulation: The portable generator includes a voltage regulator to maintain a consistent voltage level. This is crucial for protecting connected devices from potential damage caused by voltage fluctuations.
- Power Outlets: Finally, the converted and regulated electricity is sent to the generator’s power outlets. These outlets allow you to plug in various devices, from lights to appliances, drawing power as needed.
Why Do You Need to Test The Output of Your Portable Generator?
In order to ensure the reliable performance of your portable generator, it is crucial to regularly test its output. Testing the output helps identify any potential issues or malfunctions that might arise during operation. One key reason for testing is to verify that the generator is producing the correct voltage and frequency. If the output voltage is too low or too high, it can lead to damage to connected devices or appliances. Similarly, incorrect frequency can impact the functionality of electronic equipment.
Regular testing also helps in confirming the stability and consistency of the generator’s output. Fluctuations in voltage or frequency can be harmful to sensitive electronics, causing them to malfunction or fail. By conducting periodic tests, you can catch any irregularities and address them before they escalate into more significant problems.
Thus, testing the output of your portable generator is essential to guarantee its proper functioning and prevent potential damage to connected devices. It is a simple yet effective practice to ensure that your generator is always ready to provide the power you need in times of emergencies or when off-grid.

How to Test Portable Generator Output?
Portable generators are essential for providing backup power during outages. Ensuring the proper functioning of your generator is crucial. Testing the output helps verify its reliability and safety.
- Safety First:
- Before testing, ensure the generator is turned off and has cooled down.
- Disconnect all loads from the generator to prevent electrical accidents.
- Inspect the Generator:
- Check for any visible damage or wear on the generator and its cables.
- Ensure there are no loose connections or frayed wires.
- Prepare a Load:
- Connect a known working electrical device, such as a light bulb or power tool, to the generator.
- Ensure the device’s power requirements are within the generator’s capacity.
- Turn On the Generator:
- Start the generator following the manufacturer’s instructions.
- Allow it to run for a few minutes to stabilize.
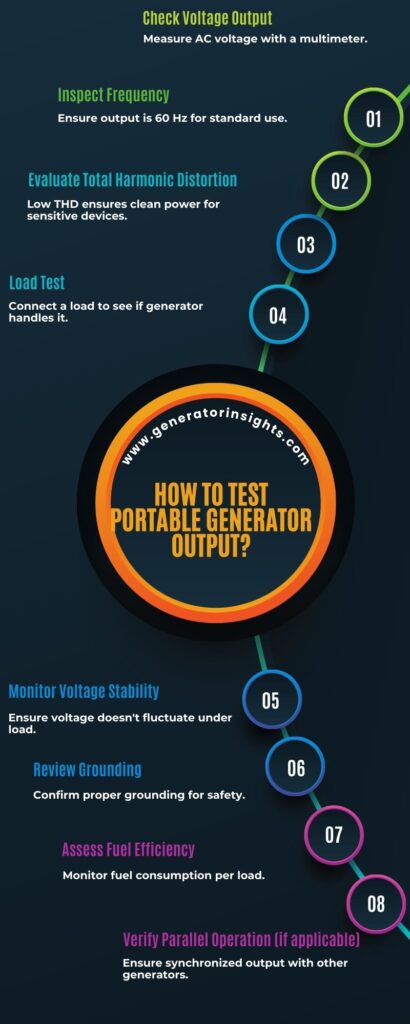
- Check Voltage Output:
- Use a multimeter to measure the voltage output at the generator’s outlets.
- Compare the reading with the generator’s rated voltage (usually 120V or 240V).
- Verify Frequency:
- Set the multimeter to measure frequency (Hz).
- Check if the generator produces the correct frequency value (usually 60Hz in the U.S.).
- Stability Test:
- Gradually introduce additional loads to the generator.
- Monitor voltage and frequency to ensure they remain within the acceptable range.
- Inspect for Fluctuations:
- Watch for any voltage fluctuations on the multimeter.
- Unstable output may indicate a problem with the generator’s internal components.
- Shut Down Safely:
- Turn off the generator following the manufacturer’s instructions.
- Allow it to cool down before disconnecting any devices.
Remember, regular testing ensures your portable generator remains reliable and ready for use during emergencies.
Now let’s discuss the testing process in more detail.
1. Ensure Safety First
Before conducting any tests on your portable generator, prioritizing safety is paramount. Start by making sure the generator is turned off and has had sufficient time to cool down. This precautionary measure reduces the risk of electrical shocks and potential burns. Additionally, it’s crucial to disconnect all loads from the generator, preventing any inadvertent contact with live electrical circuits.
Taking these safety steps establishes a secure environment for both you and the equipment. Always adhere to the manufacturer’s safety guidelines to minimize any potential hazards during the testing process.
2. Inspect the Generator
A thorough visual inspection of the generator is the next critical step in the testing process. Carefully examine the generator and its associated cables for any signs of damage or wear. Look out for frayed wires or loose connections that may compromise the generator’s functionality.
By ensuring that the generator is in good physical condition, you reduce the likelihood of encountering issues during the testing phase. Addressing any visible concerns early on can contribute to the overall longevity and reliability of your portable generator. Regular visual inspections form an integral part of responsible generator maintenance.
3. Prepare a Load
Once the safety checks are complete and the generator is visually inspected, the next step is to prepare a load for testing. Choose a known working electrical device, such as a light bulb or power tool, and connect it to the generator. It’s crucial to verify that the power requirements of the selected device fall within the generator’s capacity to avoid overloading.
This step essentially simulates real-world usage conditions, allowing you to assess how well the generator responds to a load. Choosing an appropriate load ensures accurate testing and helps identify any issues related to the generator’s output under normal operating conditions.
4. Turn On the Generator
After connecting the load, follow the manufacturer’s instructions to start the generator. Allow it to run for a few minutes to stabilize its operation. Starting the generator and letting it run ensures that it reaches a consistent output state, providing more accurate measurements during the subsequent testing phases.
Observing the generator during this period also allows you to identify any unusual sounds, vibrations, or other signs that might indicate potential problems. It’s essential to give the generator sufficient time to settle into a stable operating condition before proceeding with the voltage and frequency measurements.
5. Check Voltage Output
Here’s how to check voltage output of a portable generator:
- Start the Generator:
- Ensure the portable generator is running and has reached a stable operating state. This may take a few minutes after starting the generator.
- Prepare the Multimeter:
- Set the multimeter to measure voltage. Ensure the multimeter is in good working condition and set to an appropriate voltage range for the generator’s output.
- Connect the Multimeter:
- Carefully connect the multimeter leads to the generator’s outlets. Make sure to match the red lead to the positive (+) terminal and the black lead to the negative (-) terminal.
- Record the Voltage Reading:
- Take a voltage reading from the multimeter display. This reading represents the actual voltage output from the generator at that moment.
- Compare with Rated Voltage:
- Identify the rated voltage of your generator (commonly 120V or 240V). Compare the recorded voltage reading from the multimeter with this rated value.
- Evaluate for Deviations:
- If the recorded voltage significantly deviates from the rated voltage, it may indicate potential issues with the generator’s voltage regulation system. A significant deviation could affect the proper functioning of connected electrical devices.
- Consider Possible Causes:
- Investigate potential causes for any observed discrepancies, such as damaged cables, loose connections, or internal generator issues. Addressing these problems early on helps prevent further damage and ensures reliable generator performance.
- Document and Take Action:
- Record the voltage reading and any observed deviations for future reference. If necessary, consult the generator’s manual for troubleshooting steps or seek professional assistance to rectify identified issues.
Checking the voltage output is a crucial step in ensuring the generator is delivering the expected power, maintaining the reliability of connected electrical devices, and addressing any potential problems promptly.
6. Verify Frequency
After checking the voltage output, switch the multimeter to measure frequency (Hz). Ensure the multimeter is set to an appropriate frequency range for the generator’s output.
- Connect the Multimeter:
- Reconnect the multimeter leads to the generator’s outlets. The red lead goes to the positive (+) terminal, and the black lead goes to the negative (-) terminal.
- Set the Multimeter Display:
- Check the multimeter display for the frequency reading. The unit of measurement for frequency is Hertz (Hz).
- Verify the Generator’s Frequency:
- Compare the frequency reading on the multimeter with the expected frequency value for your region. In the United States, the standard frequency is typically 60Hz.
- Evaluate for Deviations:
- If the recorded frequency deviates significantly from the standard frequency, it could impact the performance of electrical devices. A consistent frequency is crucial for proper operation.
- Consider Potential Issues:
- Investigate potential causes for any observed discrepancies in frequency. Factors such as engine speed variations or generator malfunctions may contribute to frequency deviations.
- Record and Document:
- Record the frequency reading and any observed deviations for future reference. This documentation aids in tracking the generator’s performance over time and facilitates troubleshooting if issues arise.
- Address Any Identified Problems:
- If the frequency is not within the acceptable range, take appropriate action to address the issue. Consult the generator’s manual for troubleshooting steps or seek professional assistance if needed.
Verifying the frequency ensures that the generator not only produces the correct voltage but also does so at the right rate, crucial for the proper functioning of connected electrical devices. This step is integral to comprehensive generator output testing.
7. Stability Test
After verifying voltage and frequency, conduct a stability test by gradually introducing additional loads to the generator. Start with smaller devices and progressively add more to assess how the generator responds. Monitor both the voltage and frequency during this process to ensure they remain within the acceptable range.
A stable generator should maintain consistent output even when subjected to varying loads. If you observe significant fluctuations or deviations outside the acceptable range, it could indicate problems with the generator’s internal components or its capacity to handle variable loads.
8. Inspect for Fluctuations
While conducting the stability test, keep a close eye on the multimeter readings for any signs of voltage fluctuations. Fluctuations can indicate issues such as poor voltage regulation or instability within the generator’s electrical system. Unstable output can lead to potential damage to connected devices and compromise the overall reliability of the generator.
Identifying and addressing fluctuations during the stability test is crucial for ensuring that the generator can handle dynamic loads without compromising the quality of the electrical output. Regular stability testing is essential for maintaining the generator’s dependability over time.
9. Shut Down Safely
Once you have completed the testing procedures, it’s essential to shut down the generator safely. Follow the manufacturer’s instructions for turning off the generator, and allow it to cool down before disconnecting any devices. This step is crucial to ensure the safety of both the operator and the equipment.
- Turn off the Generator: Use the designated controls or switches to power down the generator. Avoid abrupt shutdowns, as they can lead to electrical surges or damage.
- Cool Down Period: Generators can become hot during operation. Allow the generator to cool down before touching or inspecting it further. This prevents the risk of burns and ensures safe handling.
- Disconnect Devices: After the generator has cooled down, disconnect all devices and loads. This prevents any potential electrical hazards and ensures a clean disconnection.
Adhering to proper shutdown procedures not only enhances safety but also contributes to the longevity of the generator. Regularly practicing safe shutdown measures helps prevent unnecessary wear and tear on the equipment, ensuring it remains in good working condition for future use.
Troubleshooting Common Generator Output Issues
In some instances, generators may encounter issues that affect their output. Identifying and resolving these problems is crucial for maintaining a smoothly running system. Below, we’ll explore common generator output issues and provide solutions.
| Issue | Possible Causes | Troubleshooting Steps |
|---|---|---|
| Low Power Output | – Fuel supply issues, such as clogged filters. | 1. Check fuel filters for blockages. 2. Inspect fuel lines for leaks. 3. Ensure the fuel tank has an adequate supply. 4. Verify the air supply to the generator. 5. Examine the exhaust system for obstructions. |
| Fluctuating Voltage | – Voltage regulator malfunctions. | 1. Test the voltage regulator for proper functioning. 2. Check for loose connections in the electrical system. 3. Inspect the condition of the generator’s brushes. 4. Examine the automatic voltage regulator (AVR) for faults. |
| Overheating | – Inadequate cooling or coolant issues. | 1. Ensure proper ventilation around the generator. 2. Check coolant levels and top up if necessary. 3. Inspect the radiator for obstructions. 4. Verify the operation of the cooling fan. 5. Address any leaks in the cooling system. |
| Excessive Noise | – Loose or damaged components, lack of maintenance. | 1. Tighten loose bolts and connections. 2. Inspect components for damage and replace if needed. 3. Lubricate moving parts regularly. 4. Check for worn-out or misaligned belts. 5. Ensure the generator is placed on a stable surface. |
| Starter Motor Issues | – Faulty starter motor or weak battery. | 1. Test the starter motor for proper operation. 2. Check the battery voltage and replace if necessary. 3. Inspect the starter solenoid for faults. 4. Ensure proper connections between the battery and starter motor. |
| Fuel Contamination | – Presence of water or impurities in the fuel. | 1. Drain and replace contaminated fuel. 2. Install a fuel filter/water separator. 3. Regularly monitor fuel quality. 4. Store fuel in clean, sealed containers. 5. Keep the fuel tank and system free from debris and contaminants. |
Remember to follow safety protocols and manufacturer guidelines when troubleshooting generator issues. If problems persist, consult a professional technician for further assistance.
Portable Generator Maintenance Tips
Portable generators are essential for power backup during emergencies, but regular maintenance is crucial for their reliable performance.
- Inspect Fuel System:
- Regularly check the fuel system for leaks, ensuring proper storage and using fresh fuel to prevent clogs.
- Oil Change:
- Conduct oil changes according to the manufacturer’s recommendations, typically after every 50-100 hours of use, to keep the engine running smoothly.
- Air Filter Check:
- Inspect and clean or replace the air filter regularly to maintain proper airflow and prevent engine damage.
- Spark Plug Examination:
- Check the spark plug for signs of wear or deposits, and replace it if necessary, to ensure efficient combustion.
- Battery Inspection:
- Regularly inspect the battery for corrosion and ensure it’s charged, as a well-maintained battery is crucial for starting the generator.
- Run the Generator Regularly:
- Start the generator and let it run for a few minutes regularly, even if not in use, to prevent fuel system issues and keep internal parts lubricated.
- Store Properly:
- When not in use, store the generator in a dry and well-ventilated space, protecting it from extreme temperatures and moisture.
Portable Generator Safety Tips
Portable generators are handy during power outages, but improper usage can pose serious risks. Follow these safety tips to ensure a secure experience.
- Location Matters:
- Place the generator outdoors, away from doors and windows, to prevent carbon monoxide buildup. Keep it on a dry surface under an open canopy if it’s raining.
- Ventilation is Key:
- Ensure proper ventilation around the generator to disperse exhaust fumes. Avoid enclosed spaces, as CO buildup can be lethal.
- Fueling Caution:
- Turn off the generator and let it cool before refueling to prevent fires. Store fuel in approved containers away from the generator.
- Electrical Connections:
- Use heavy-duty extension cords designed for outdoor use. Inspect them for damage before connecting, ensuring they match the generator’s wattage.
- Grounding Matters:
- Connect the generator to a grounding rod to reduce the risk of electrical shock. Follow manufacturer instructions for proper grounding procedures.
- Regular Maintenance:
- Perform routine checks on oil levels, fuel filters, and air filters to ensure the generator operates efficiently and safely.
- Load Management:
- Avoid overloading the generator by calculating the total wattage of connected devices. Prioritize essential appliances to prevent damage.
- Monitoring Run Time:
- Don’t run the generator continuously; allow it to cool down periodically to prevent overheating. Follow the manufacturer’s guidelines for recommended run times.
- Carbon Monoxide Alarms:
- Install carbon monoxide detectors in your home, especially near sleeping areas, to provide early warnings in case of CO leaks.
Remember, safety is paramount when using portable generators, and adherence to these guidelines minimizes the risk of accidents.
Conclusion
In conclusion, understanding How to Test Portable Generator Output is a crucial skill for any generator owner. Regular testing not only ensures that your generator is operating optimally, but also gives you peace of mind in times of need. By monitoring voltage, frequency, and load capacity, you can trust that your generator will provide the power you require.
As you embark on your journey to generator proficiency, let this guide be your trusted companion. With the knowledge and skills gained here, you’ll be well-equipped to face any power outage or emergency with confidence.
References
- Should we use a portable generator in an emergency?
- Carbon monoxide poisoning from portable electric generators
- Active-passive control of portable generator set radiated noise
- Studies on control of noise from portable power generator
Frequently Asked Questions
Can I Test the Output of My Generator Without Using a Multimeter?
To test the output of a generator without a multimeter, alternative testing methods can be used. However, it is important to be aware of signs indicating generator output issues, such as fluctuating power, abnormal noises, or electrical malfunctions.
How Long Does It Take to Test the Output of a Portable Generator?
Testing the output of a portable generator involves several steps. These include measuring the voltage and frequency, checking for proper grounding, and verifying the power output using a load bank or other testing equipment. The duration of the testing process may vary depending on the specific generator and the thoroughness of the testing procedures.
What Should I Do if the Readings From My Multimeter Are Inconsistent?
If the readings from your multimeter are inconsistent, it is essential to troubleshoot the issue. Check for loose connections, ensure proper calibration of the multimeter, and consider using alternative testing methods such as a load bank to verify the generator’s output.
Is It Possible to Damage My Generator While Testing Its Output?
It is important to exercise caution when testing portable generator output to avoid potential damage. Common generator problems can arise if improper testing methods are employed, highlighting the need for proper generator maintenance and testing procedures.
How Often Should I Test the Output of My Portable Generator?
It is important to regularly check the output of your portable generator to ensure its proper functioning. This can be done by using a multimeter to measure voltage and frequency readings, and interpreting the results according to the generator’s specifications.
How do you measure the power output of a generator?
Companies typically assess the generator’s output in Watts (W) or KiloWatts (kW), using the formula Watts = Volts × Amps. For instance, a 5kW generator at 120 Volts yields an output of 41.67 amps.
How do you load test a portable generator?
To conduct a load test, one initiates the generator and allows it to run until the voltage stabilizes. Then, the automatic transfer switch shifts to the emergency power source. Gradually increasing the load in simulated facility conditions enables a comprehensive assessment.
How do you tell if power comes back on if using a generator?
Upon switching to generator power, activating the buzzer switch, linked to the mains, serves as a notification mechanism. When power is restored, the buzzer alerts the user to transition back to mains power, facilitating the shutdown of the generator.